John Sweeney's Cotswold Morris Dance Tutorial Videos

Introduction

Basics Tutorial Video

Adderbury Tutorial Video

Badby Tutorial Video

Bampton Tutorial Video

Fieldtown Tutorial Video - Stepping & Slows

Fieldtown Tutorial Video - The Galley

Ilmington Tutorial Video

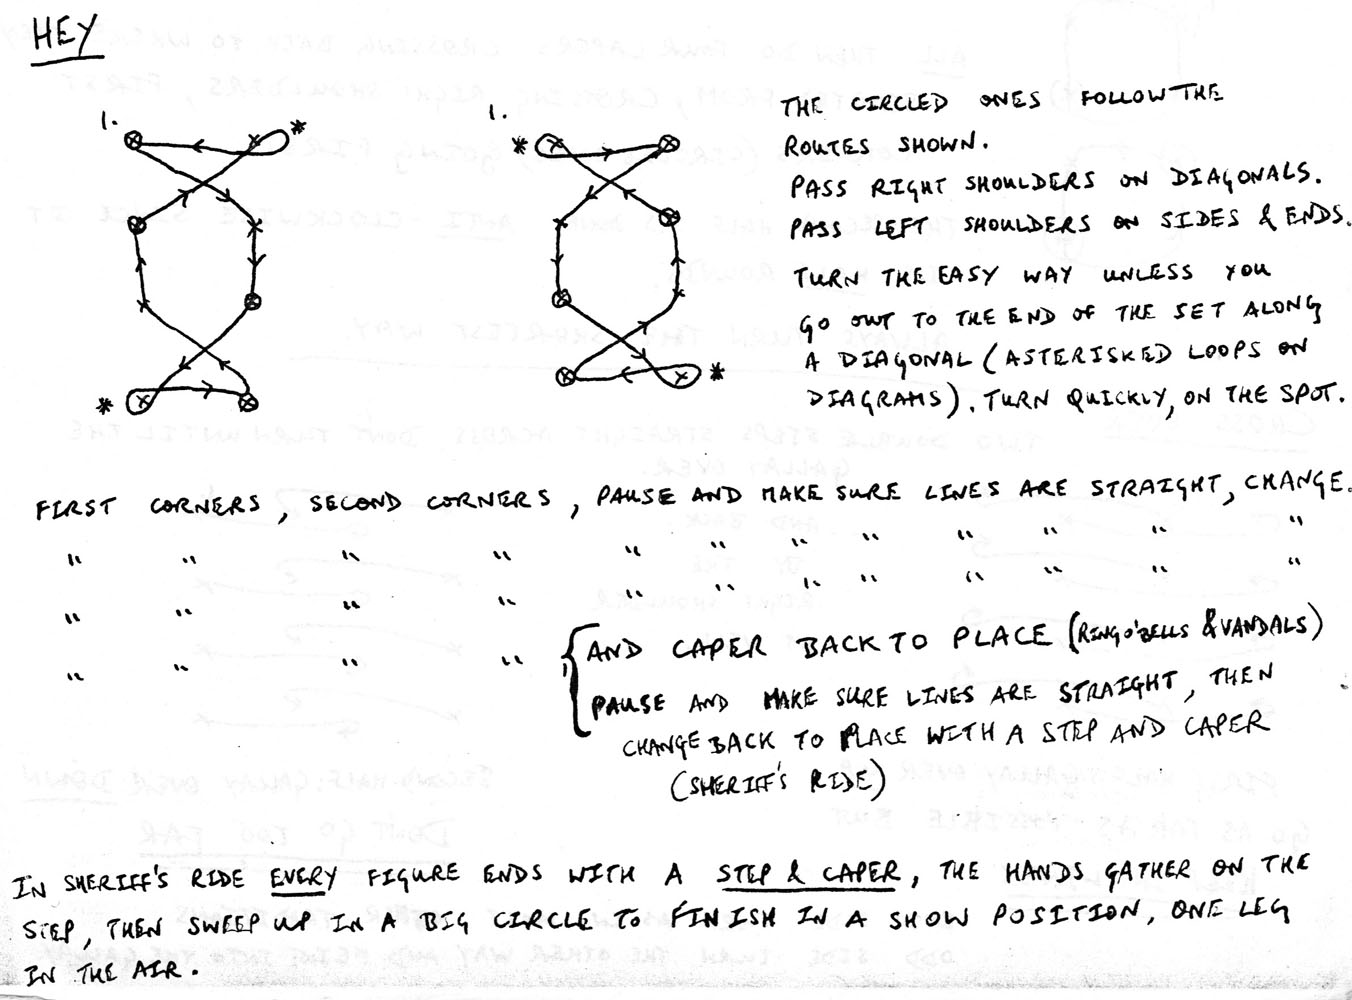
Lichfield Sheriff's Ride Tutorial Video

John Sweeney's Morris Dance Notes

Introduction

These videos were made to help East Kent Morris.

Traditions

In the same way that a song can be made up of verses and choruses, a Morris Dance is made up of figures and choruses. Each village had its own style of dancing; we call these different styles traditions. So, in the Fieldtown tradition the standard figures are: While, in the Adderbury tradtion most dances start with a Walk Around, then the standard figures are: The chorus is unique to the dance, but simple choruses often appear in multiple traditions. This is great, because once you can dance the Adderbury figures you can learn a new dance just by learning a new chorus.

A Set

The vast majority of dances are done with six dancers in two lines of three:

Morris Set

In a Corner Dance the chorus is normally done first by #1 and #6 (First Corners), then by #2 and #5 (Second Corners), then by #3 and #4 (Third Corners).

One useful convention is that new dancers always dance on the even side. This ensures that they are opposite someone who should know what they are doing, so that they can work with them and copy what they do. Your eyes are one of your most useful tools. Mimic your partner; watch what First Corners do; copy them.

Basic Stepping

Despite the differences between traditions, basic concepts, such as the stepping, remain consistent. For example, the standard stepping in both Fieldtown and Adderbury figures is: A Double Step is 1-2-3-hop or Right-Left-Right-Hop Right. Let's abbreviate that to R-L-R-HR.

A Single Step is 1-hop or R-HR.

So, a figure in Fieldtown and Adderbury is R-L-R-HR, L-R-L-HL, R-HR, L-HL, FTJ.

But, there are other differences between the traditions, for example: All of these concepts, plus details of how to do good stepping are covered in the tutorial videos.

Music

Most Morris tunes consist of two parts. The first part is called the A music and is used for the figures. The second part is called the B music and is used for the choruses. Occasionally there is a third part with a different tune, but more commonly, if there is a third part it is actually a slow version of the B music; it is used for complex foot and arm movements knows as Slows. Either way, that third piece of music is usually referred to as the C music.

The musician usually plays an A music as an introduction to the dance; this is called Once to Yourself.

Try watching some of these
videos. See if you can hear the A music and the B music, and see how they fit to the figures and choruses. See The Toast and Zig-Zag for examples of Fieldtown Slows.

A Living Tradition

It is important to understand that the Morris is a living tradition. It is subject to the Folk Process: the way that a dance is transformed and re-adapted in the process of its transmission from person to person and from generation to generation. Sometimes these changes are intentional; sometimes they are improvisations that prove popular; sometimes they are just caused by misremembering, A group of Morrs dancers is known as a side. Each side develops its own repertiore and its own style, often choreographing new dances.

These tutorials are based on my fifty years of Cotswold Morris dancing, thirty years with The Dolphin Morris Men and twenty years with East Kent Morris. During that time I have learnt from numerous experts including Roy Dommett for Ilmington, Bert Cleaver for Fieldtown and Green Man's Morris for Lichfield. I used to watch Bampton and Headington in the 1970s. I have danced with many other sides from time to time and have studied many books on various aspects of the Morris.

I try to teach the Morris as I learnt it, but sometimes I may have chosen to do something differently, or developed my own style over the years. Hopefully you will find the basic concepts taught in these videos useful. Most of the material should apply to any Cotswold Morris side, but you may need to modify some of it to match you side's style.

Basics Tutorial

This covers:

The only way to get good at the Morris is to practice. Choose a
video and dance along to it at home. Build muscle memory. Until you can do two Double Steps, two Single Steps, Feet-Together-Jump without thinking then you can't focus on the shape of the figures.

Adderbury Tutorial


The Adderbury dancers, in their booklet, say, "Handkerchieves are tied on two diagonal corners", as described in Cecil Sharp's The Morris Book Part II. It is not something I have ever seen or done.


Badby Tutorial

A brief tutorial covering the steps and hankie movements for dances such as Broad Cupid and Cuckoo's Nest.


Bampton Tutorial

There are many different styles of Bampton Morris Dancing. The Dolphin Morris Men Foreman was Ian Stewart. Ian was an excellent teacher with a great love of the Morris. In the 1970s we used to go on the NTMC coach trip to Oxford every Whit Monday and watch the Bampton dancers in their natural habitat, then on to Headington in the evening to see Headington dance. Ian studied these traditional sides intently and taught us all what he had learnt. So what I am teaching in this video is our approximation of what one of the Bampton sides was dancing in the 1970s. I may have changed it over the years!

One key decision to make is whether you raise your hankies on the beat, as you step, or on the anacrusis, a half-beat before you step. I favour the latter.

Is it Furry Caper? Or Forrie? Or Forry? Or Furrie? Do I care?

Fieldtown Stepping & Slows Tutorial

One key decision to make is whether you raise your hankies on the beat, as you step, or on the anacrusis, a half-beat before you step. I favour the latter.

I learnt my Fieldtown with Dolphin Morris Men in the 1970s, then went to many of Bert Cleaver's instructionals.

There are many variations of the Slows, especially the hand movements. Bert taught that the first two steps of each slow are preparation, then you get your body, your arms, your hands and your hankies as high as you can on the leap. You need to decide what the point of the slows is. For me, it is that high leap as in this picture:

RTB

So, I teach what I learnt from Bert: keep the first two steps small and precise then get everything as high as you can on the leap.

A note on preparation: Some sides, in a Fieldtown corner dance, get second and third corners to prepare by stepping forwards, then they prepare by dancing backwards and jumping, then prepare for the leap with the first two steps of the Slow. So, they are preparing for the preparation for the preparation! Bert went for the purity of standing still until you start the Slow. I prefer to have the dancers come in with the Back Steps, but stepping forwards first is a step too far as far as I am concerned.

The Fieldtown Galley Tutorial


How Good Is Your Galley?

I see a lot of poor Galleys in videos, with fading (by a random amount) into the turn on the first step, a random number of hops, arms flapping, and weak or no jumps at the end of a Galley-Feet-Together-Jump sequence.

This is how I was taught by Ian Stewart of The Dolphin Morris Men, plus lots more information from Bert Cleaver at workshops later.

Please note: This is about the Fieldtown Galley, but most of the principles apply to all Galleys.

Let's start with the first step. Cecil Sharp doesn't specify the initial foot placement. Bert Cleaver says, in his "Fieldtown Dances & Jigs" booklet, that "The supporting foot points straight forward initially". When you do a Galley, without a turn or a jump, in a dance like Banks of the Dee, then you step forwards and keep your supporting foot pointing in the direction you are facing. Galleys with turns work well when you start in the same way. When you dance a Fieldtown Foot Up and Down it looks really great when all six dancers step forwards for the Galley, and pause with their arms out for the first step of the Galley.

What is equally important, in that first step, is what you do with the trailing leg. If you watch a dancer or an ice-skater spin, you will see them extend their arms to one side, then sweep the arms around and bring them in to the body. They are building up angular momentum in the arms, and then transferring it to the body. In a Galley, you do the same thing, but with that trailing leg. Leave it well behind and out to the side as though it were stuck in a bucket of mud, then bring it round, up and in as you hop. The angular momentum from your sweeping leg is transferred to your body and you automatically turn.

There are two hops and the timing for Step-Forwards, Hop, Hop is Slow-Quick-Quick. The turn is on the hops; always do the turn while you are in the air so that you don't put any stress on your ankle. During the hops your arms should still be out; your upper leg should be horizontal; you make a small circle with the foot on each hop: in a Galley Left you step forwards onto the left foot, so the right foot is in the air and makes two small anti-clockwise circles, one on each hop.Let the foot hang naturally; don't point the toes.

To practice the turns, start with small turns. Practice until you can do a perfect quarter turn, then try half turns and more. The good news is that most Galleys are only half or three-quarters.

The arms should be out to the side to give you good balance. The upper body should be upright. Don’t look down!

When teaching the Galley I get the dancers to pair up and take it in turns to practice while their partner watches and tells them how they look.

I am still trying to get all of my side to step forwards! They do it quite well on corner dances at the end of a crossing, but not always in the Foot Up & Down.

How do you Galley? Does any side manage to get everyone to step forwards?

Of course, your side may choose to make a quarter turn on the first step of the Galley. Decisions like that are fine, as long as you can get everyone to do it in the same way.

I often find it worthwhile to contrast the Bledington Hook Leg with the Fieldtown Galley-FTJ as some dancers tend to blur them together.

Hook Leg: quarter turn on each step, the Hook is more like a cycling movement, four equally timed steps, two Capers at the end
Galley: all the turn is in the Hops, the trailing foot describes an arc, the timing is Slow-Quick-Quick, Feet-Together-Jump at the end

I do the
Sherborne Galley the same way

I do Longborough Galleys the same way; this is challenging in the Hey with its 360 degree turn on the Galley.

In Ascot-under-Wychwood your momentum is usually backwards as you start the Galley, so it is natural to turn on the first step.


Ilmington Tutorial

This is how I remember learning Ilmington from
Roy Dommett

at Sidmouth International Folk Festival in the late 1970s.

Paul Bryan of The Traditional Ilmington Morris Men has had a look at the video and has confirmed that it is in essence very good.

However, there are a few differences in the way that I teach it and the way that they dance it today. Roy's instructionals, 50 years ago, were based upon his collecting in the village in the 1960s and what he had witnessed from being with The Traditional Ilmington Morris Men from 1974 onwards. I also attended one of their practices around 1980.

The 1989 Ilmington Booklet says:

During the stepping sequences, the hand movements are as follows:
D.....U...../D.....U...../D.....U..D../...U.......

The Down Up hand movements are relaxed, starting with hands fairly close together at chin level, moving downwards and outwards to just behind the thighs. The downward movement is slightly faster than the upward movement. There is a 'snatch' in the third bar, similar to that in the Ducklington dances.


In the video I don't do the slight diagonal movement described above.

The Traditional Ilmington Morris Men do two of the figures differently:

Where I do an "Into Line" they go further forwards, i.e. a Half Gyp, which they call "Shoulders".

Where I do a Foot Up & Down they do a Foot Up, where the second half is done facing across:
Start the dance facing your partner for the Once To Yourself; Turn to Face Up on the Jump; Foot Up as in the video; stay facing your partner and dance on the spot (with no turn) instead of a Foot Down.


The dance should finish with feet together and facing across to your partner with arms aloft and apart.

The standard dance format is: You can see the Traditonal Ilmington Morris Men dancing in these videos:

Jubilee

Sturch's Piece

Lichfield Sheriff's Ride Tutorial

This is how I remember learing Lichfield from
Green Man's Morris in the 1970s.

Recently I was studying the original notes and saw that it says, "back to back into line both ways". So, we now dance a Back to Back Into Line. (Yes, I ignored the "both ways"!)

Here are the notes I made back in the 1970s on how to do the Lichfield Hey. I don't emphasise the turns on the corners until the dancers can do the Hey without thinking:

Lichfield Hey


John Sweeney's Morris Dance Notes

There is lots more about my background and the dances that I have choreogaphed at
John Sweeney's Morris Dance Notes.

Many thanks to all the great dancers and musicians who have taught me so much over the years, and who have danced and played with me. It has been wonderful! Thank you!

Feedback is much appreciated. Please send any comments, additions, corrections or ideas to John Sweeney (john@modernjive.com).

= = = = = = = = = = = = = = = = = = = = = = = = =

Karen and I dance lots of different styles. You can see some of them here.

Lots more dancing material at my two Web sites:
modernjive.com and contrafusion.co.uk.

= = = = = = = = = = = = = = = = = = = = = = = = =


Contrafusion